Block tree (JSON)
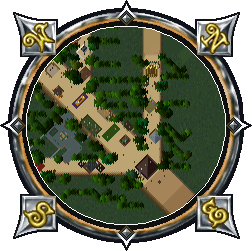
{"type":"doc","content":[{"type":"paragraph","content":[{"type":"text","text":"Dreadhorn is a quest given by "},{"type":"reference","attrs":{"target_type":"npc","target_id":161,"label":null}},{"type":"text","text":" who can be found in "},{"type":"reference","attrs":{"target_type":"article","target_id":841,"label":null}},{"type":"text","text":". This quest will make you gain entrance to "},{"type":"reference","attrs":{"target_type":"article","target_id":1892,"label":null}},{"type":"text","text":". This quest can only be completed once, but you can still enter the "},{"type":"reference","attrs":{"target_type":"article","target_id":1892,"label":null}},{"type":"text","text":" after the quest has been completed."}],"attrs":{"align":null}},{"type":"paragraph","content":[{"type":"text","text":"Defeating Dreadhorn is also an assigned task from [[Hawkwind]] for those wanting to gain the Mastery of Chivalry."}],"attrs":{"align":null}},{"type":"heading","attrs":{"level":2},"content":[{"type":"text","text":"Quest Description"}]},{"type":"image","attrs":{"file":"questDreadhorn1a.gif","width":null,"align":null,"caption":"Lorekeeper Calendor the Keeper of Tradition"}},{"type":"paragraph","content":[{"type":"text","text":"Can you comprehend it? I cannot, I confess. The most pristine and perfect Lord of Sosaria has fallen prey to the blight. From the depths of my heart I mourn his corruption; my thoughts are filled with pity for this glorious creature now tainted. And my blood boils with fury at those responsible for the innocent creature's undoing. Will you find Dread Horn, as he is now called, and free him from this misery?"}],"attrs":{"align":null}},{"type":"bulletList","content":[{"type":"listItem","content":[{"type":"paragraph","content":[{"type":"text","text":"-"},{"type":"reference","attrs":{"target_type":"npc","target_id":161,"label":null}}],"attrs":{"align":null}}]}]},{"type":"heading","attrs":{"level":2},"content":[{"type":"text","text":"Quest Objective"}]},{"type":"bulletList","content":[{"type":"listItem","content":[{"type":"paragraph","content":[{"type":"text","text":"Slay 1 "},{"type":"reference","attrs":{"target_type":"monster","target_id":179,"label":null}}],"attrs":{"align":null}}]}]},{"type":"heading","attrs":{"level":2},"content":[{"type":"text","text":"Quest Lore"}]},{"type":"paragraph","content":[{"type":"text","text":"After accepting the quest, you need to go to "},{"type":"reference","attrs":{"target_type":"article","target_id":1892,"label":null}},{"type":"text","text":". You can get there by going through the "},{"type":"reference","attrs":{"target_type":"article","target_id":1690,"label":null}},{"type":"text","text":" shrine into "},{"type":"reference","attrs":{"target_type":"article","target_id":942,"label":null}},{"type":"text","text":" and head west to the cave opening. Enter the cave and head north to the sparkling gate."}],"attrs":{"align":null}},{"type":"heading","attrs":{"level":3},"content":[{"type":"text","text":"Keys"}]},{"type":"paragraph","content":[{"type":"text","text":"The following six items are required to be gathered to finish the quest:"}],"attrs":{"align":null}},{"type":"table","content":[{"type":"tableRow","content":[{"type":"tableCell","content":[{"type":"bulletList","content":[{"type":"listItem","content":[{"type":"paragraph","content":[{"type":"reference","attrs":{"target_type":"item","target_id":708,"label":null}}],"attrs":{"align":null}}]},{"type":"listItem","content":[{"type":"paragraph","content":[{"type":"reference","attrs":{"target_type":"item","target_id":1554,"label":null}}],"attrs":{"align":null}}]}]},{"type":"image","attrs":{"file":"Gnaw's_fang.png","width":null,"align":null,"caption":null}},{"type":"image","attrs":{"file":"Thorny_briar.png","width":null,"align":null,"caption":null}}],"attrs":{"colspan":1,"rowspan":1,"colwidth":null}},{"type":"tableCell","content":[{"type":"bulletList","content":[{"type":"listItem","content":[{"type":"paragraph","content":[{"type":"reference","attrs":{"target_type":"item","target_id":811,"label":null}}],"attrs":{"align":null}}]},{"type":"listItem","content":[{"type":"paragraph","content":[{"type":"reference","attrs":{"target_type":"item","target_id":939,"label":null}}],"attrs":{"align":null}}]}]},{"type":"image","attrs":{"file":"Irk's_brain.png","width":null,"align":null,"caption":null}},{"type":"image","attrs":{"file":"Lissith's_silk.png","width":null,"align":null,"caption":null}}],"attrs":{"colspan":1,"rowspan":1,"colwidth":null}},{"type":"tableCell","content":[{"type":"bulletList","content":[{"type":"listItem","content":[{"type":"paragraph","content":[{"type":"reference","attrs":{"target_type":"item","target_id":1258,"label":null}}],"attrs":{"align":null}}]},{"type":"listItem","content":[{"type":"paragraph","content":[{"type":"reference","attrs":{"target_type":"item","target_id":166,"label":null}}],"attrs":{"align":null}}]}]},{"type":"image","attrs":{"file":"Sabrix's_eye.png","width":null,"align":null,"caption":null}},{"type":"image","attrs":{"file":"Blighted_cotton.png","width":null,"align":null,"caption":null}}],"attrs":{"colspan":1,"rowspan":1,"colwidth":null}}]}]},{"type":"heading","attrs":{"level":4},"content":[{"type":"text","text":"Thorny Briar"}]},{"type":"paragraph","content":[{"type":"text","text":"Now it is time to obtain a "},{"type":"reference","attrs":{"target_type":"item","target_id":1554,"label":null}}],"attrs":{"align":null}},{"type":"image","attrs":{"file":"Thorny_briar.png","width":null,"align":null,"caption":null}},{"type":"paragraph","content":[{"type":"text","text":". These spawn randomly on the ground in the desert area to the northeast area of the map. Be careful while traveling this area, is appears you travel slowly throughout the desert terrain! Here is a map showing the six locations you will be traveling."}],"attrs":{"align":null}},{"type":"heading","attrs":{"level":4},"content":[{"type":"text","text":"Gnaw's Fang"}]},{"type":"paragraph","content":[{"type":"text","text":"After getting a "},{"type":"reference","attrs":{"target_type":"item","target_id":1554,"label":null}},{"type":"text","text":", head to the northwest part of the map and kill a "},{"type":"reference","attrs":{"target_type":"monster","target_id":283,"label":null}},{"type":"text","text":". The gnaw corpse will have the "},{"type":"reference","attrs":{"target_type":"item","target_id":708,"label":null}}],"attrs":{"align":null}},{"type":"image","attrs":{"file":"Gnaw's_fang.png","width":null,"align":null,"caption":null}},{"type":"paragraph","content":[{"type":"text","text":"."}],"attrs":{"align":null}},{"type":"paragraph","content":[{"type":"text","text":"After obtaining a "},{"type":"reference","attrs":{"target_type":"item","target_id":708,"label":null}},{"type":"text","text":", head south into the swamp area. The remaining four items will come from this area."}],"attrs":{"align":null}},{"type":"heading","attrs":{"level":4},"content":[{"type":"text","text":"Sabrix's Eye"}]},{"type":"paragraph","content":[{"type":"text","text":"Kill "},{"type":"reference","attrs":{"target_type":"monster","target_id":370,"label":null}},{"type":"text","text":" and receive a "},{"type":"reference","attrs":{"target_type":"item","target_id":1258,"label":null}}],"attrs":{"align":null}},{"type":"image","attrs":{"file":"Sabrix's_eye.png","width":null,"align":null,"caption":null}},{"type":"paragraph","content":[{"type":"text","text":"."}],"attrs":{"align":null}},{"type":"heading","attrs":{"level":4},"content":[{"type":"text","text":"Lissith's Silk"}]},{"type":"paragraph","content":[{"type":"text","text":"Kill "},{"type":"reference","attrs":{"target_type":"monster","target_id":367,"label":null}},{"type":"text","text":" and receive "},{"type":"reference","attrs":{"target_type":"item","target_id":939,"label":null}}],"attrs":{"align":null}},{"type":"image","attrs":{"file":"Lissith's_silk.png","width":null,"align":null,"caption":null}},{"type":"paragraph","content":[{"type":"text","text":"."}],"attrs":{"align":null}},{"type":"heading","attrs":{"level":4},"content":[{"type":"text","text":"Irk's Brain"}]},{"type":"paragraph","content":[{"type":"text","text":"Kill "},{"type":"reference","attrs":{"target_type":"monster","target_id":346,"label":null}},{"type":"text","text":" until you receive an "},{"type":"reference","attrs":{"target_type":"item","target_id":811,"label":null}}],"attrs":{"align":null}},{"type":"image","attrs":{"file":"Irk's_brain.png","width":null,"align":null,"caption":null}},{"type":"paragraph","content":[{"type":"text","text":"."}],"attrs":{"align":null}},{"type":"heading","attrs":{"level":4},"content":[{"type":"text","text":"Blighted Cotton"}]},{"type":"paragraph","content":[{"type":"text","text":"Pick up "},{"type":"reference","attrs":{"target_type":"item","target_id":166,"label":null}}],"attrs":{"align":null}},{"type":"image","attrs":{"file":"Blighted_cotton.png","width":null,"align":null,"caption":null}},{"type":"paragraph","content":[{"type":"text","text":"from the ground; it spawns frequently."}],"attrs":{"align":null}},{"type":"heading","attrs":{"level":3},"content":[{"type":"text","text":"Enchanted Mushroom Fairy Circle"}]},{"type":"paragraph","content":[{"type":"text","text":"After collecting all six quest items, head south to the statue of the faire, and drop the items onto the altar. Three "},{"type":"reference","attrs":{"target_type":"item","target_id":515,"label":null}}],"attrs":{"align":null}},{"type":"image","attrs":{"file":"Essence_of_the_wind.png","width":null,"align":null,"caption":null}},{"type":"paragraph","content":[{"type":"text","text":"will drop into your backpack which can be used to teleport all members of the party to the island. The "},{"type":"reference","attrs":{"target_type":"monster","target_id":179,"label":null}},{"type":"text","text":" can be found on this island. It will take a group of five about thirty minutes of casting earth elementals and energy vortexes to kill the Dread Horn."}],"attrs":{"align":null}},{"type":"bulletList","content":[{"type":"listItem","content":[{"type":"paragraph","content":[{"type":"text","text":"Thank you. I haven't the words to express my gratitude."}],"attrs":{"align":null}},{"type":"bulletList","content":[{"type":"listItem","content":[{"type":"paragraph","content":[{"type":"text","text":"-"},{"type":"reference","attrs":{"target_type":"npc","target_id":161,"label":null}}],"attrs":{"align":null}}]}]}]}]},{"type":"heading","attrs":{"level":2},"content":[{"type":"text","text":"Quest Reward"}]},{"type":"bulletList","content":[{"type":"listItem","content":[{"type":"paragraph","content":[{"type":"text","text":"A strongbox with about five magic items inside."}],"attrs":{"align":null}}]}]},{"type":"heading","attrs":{"level":2},"content":[{"type":"text","text":"Notes"}]},{"type":"bulletList","content":[{"type":"listItem","content":[{"type":"paragraph","content":[{"type":"text","text":"Thanks to the following adventurers for helping me gather the above quest items: Hebus, Vanyel, Hallow and Roscor!"}],"attrs":{"align":null}}]}]},{"type":"heading","attrs":{"level":2},"content":[{"type":"text","text":"See Also"}]},{"type":"bulletList","content":[{"type":"listItem","content":[{"type":"paragraph","content":[{"type":"reference","attrs":{"target_type":"article","target_id":1892,"label":null}}],"attrs":{"align":null}}]}]}]}